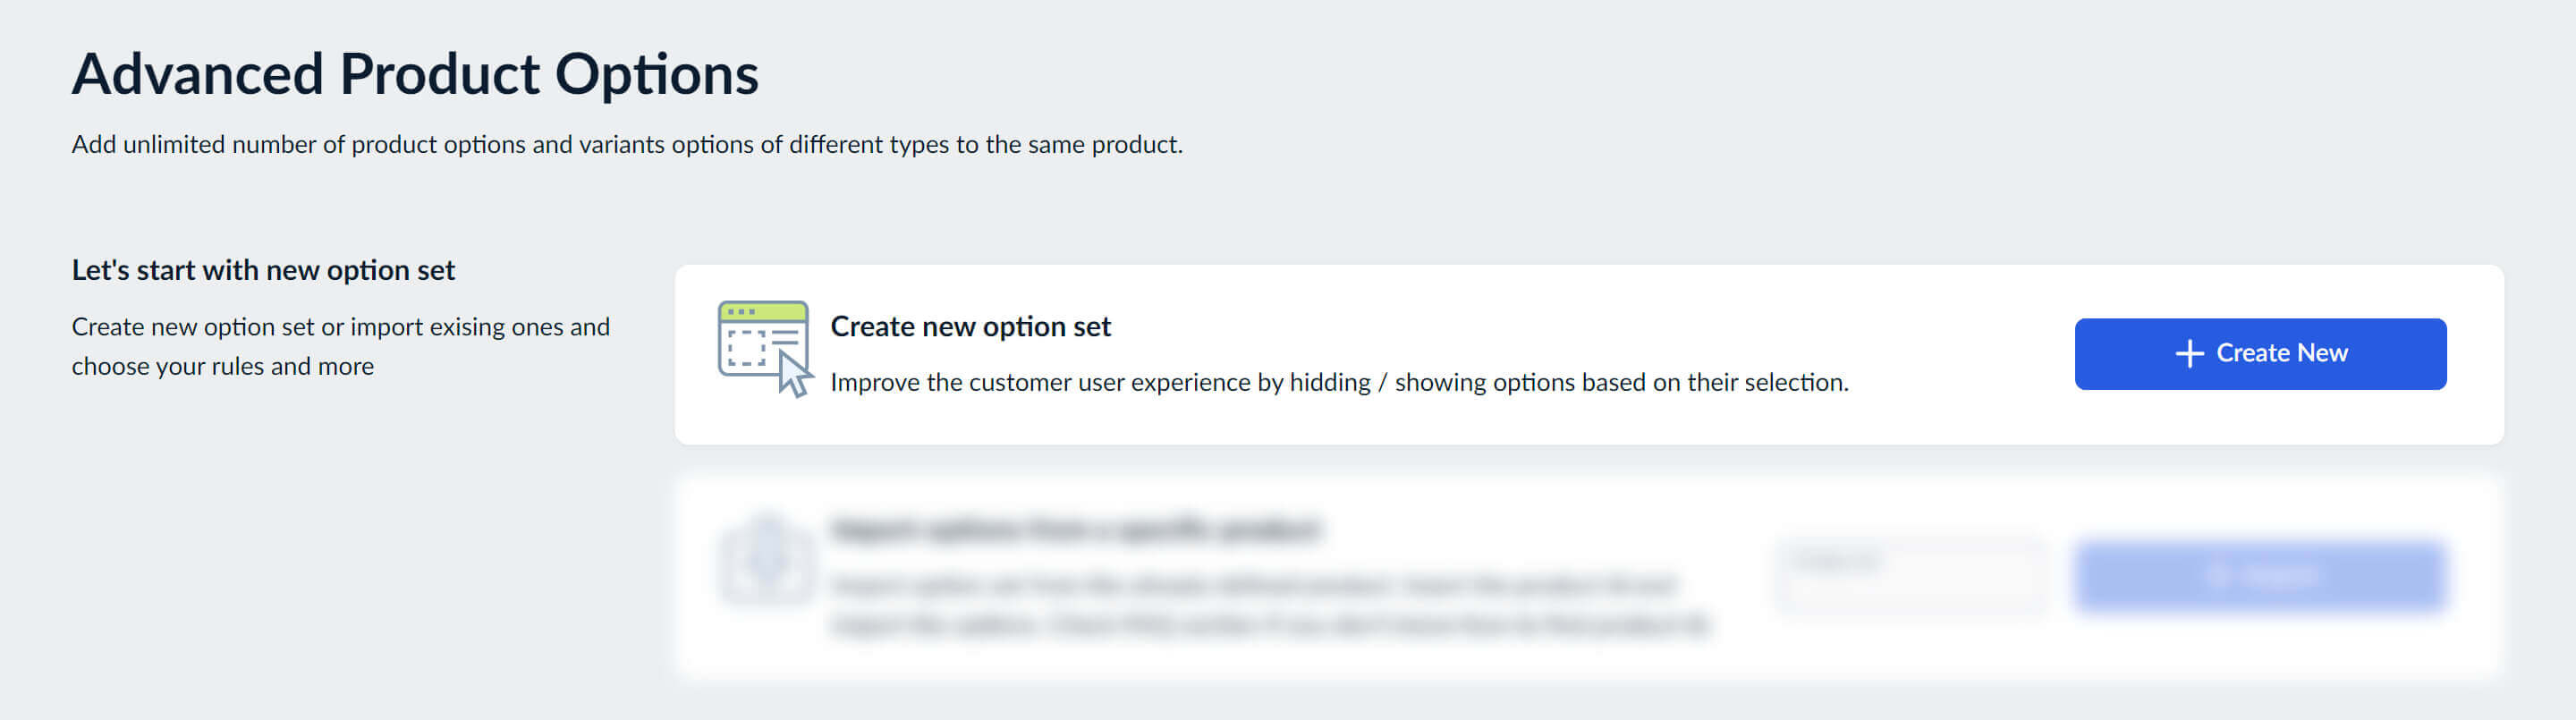
1. Create option set
You can create an option set in two ways:
-
Create an option set from scratch
-
Create an option set by importing options from an existing product
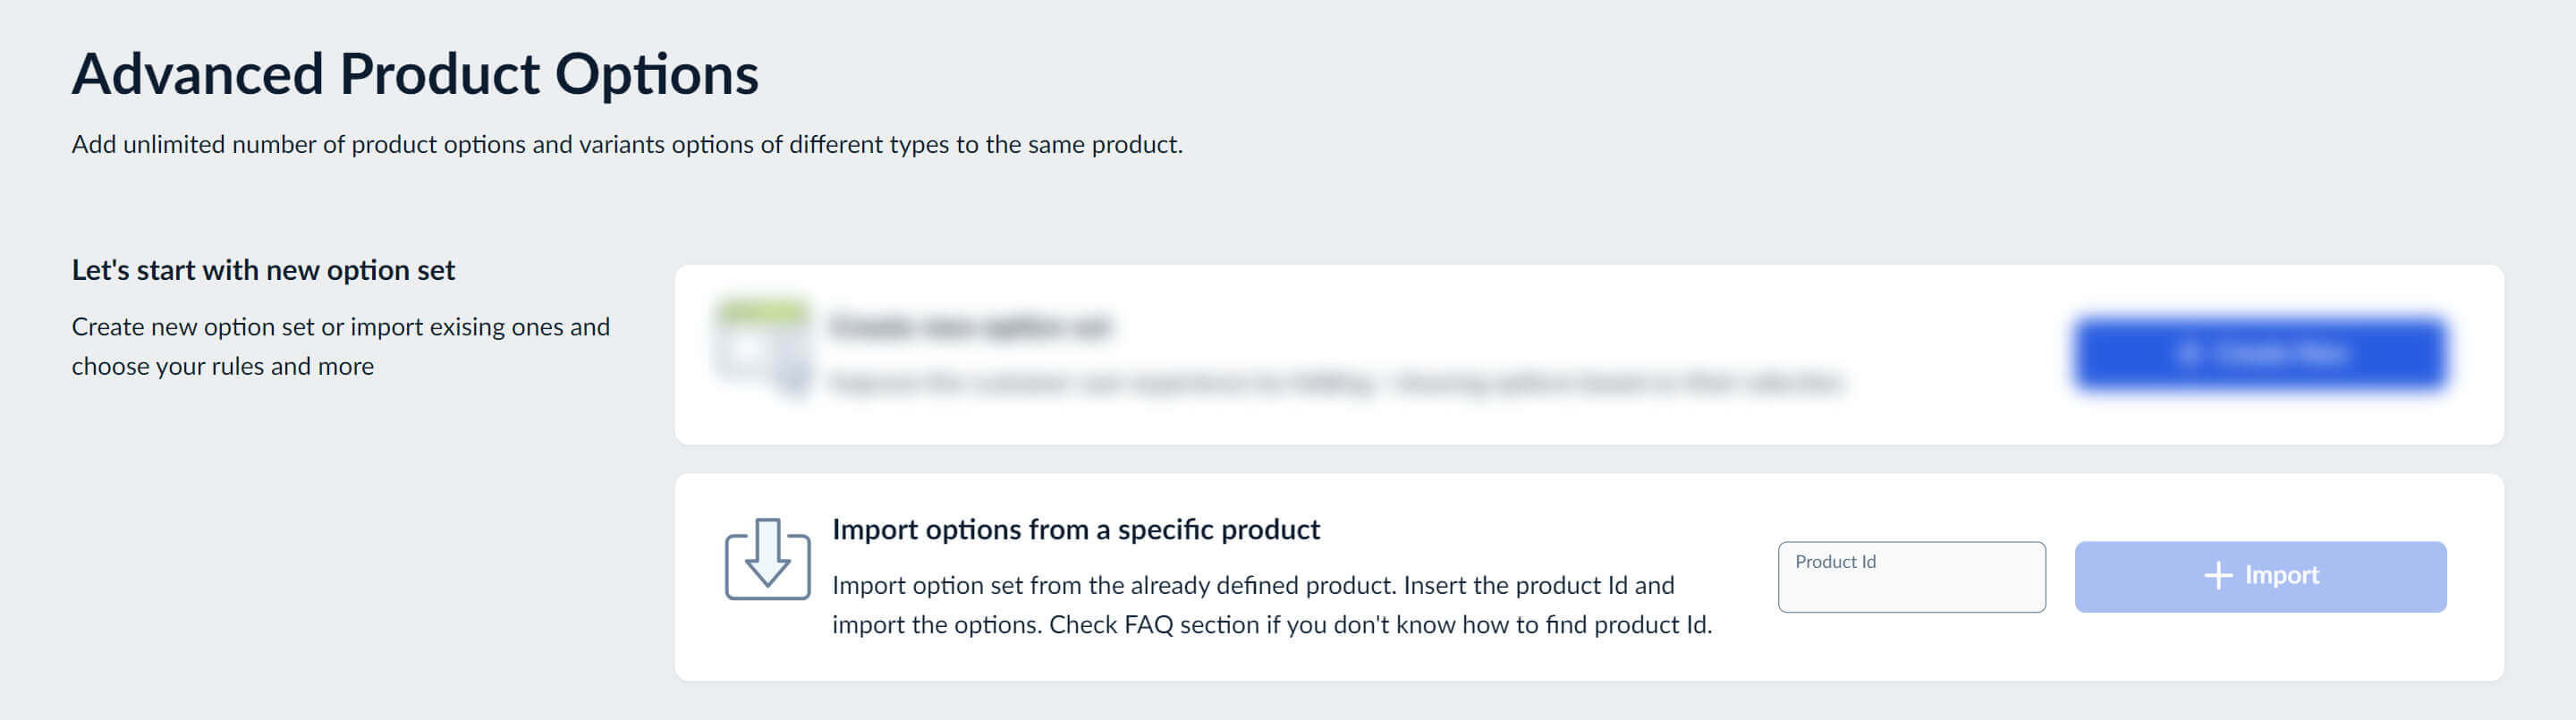
For 2. possibility you need to find the product ID and paste it into the input field. If you are not sure where to find the product ID, inside the app you will see FAQ section which will help you with that.
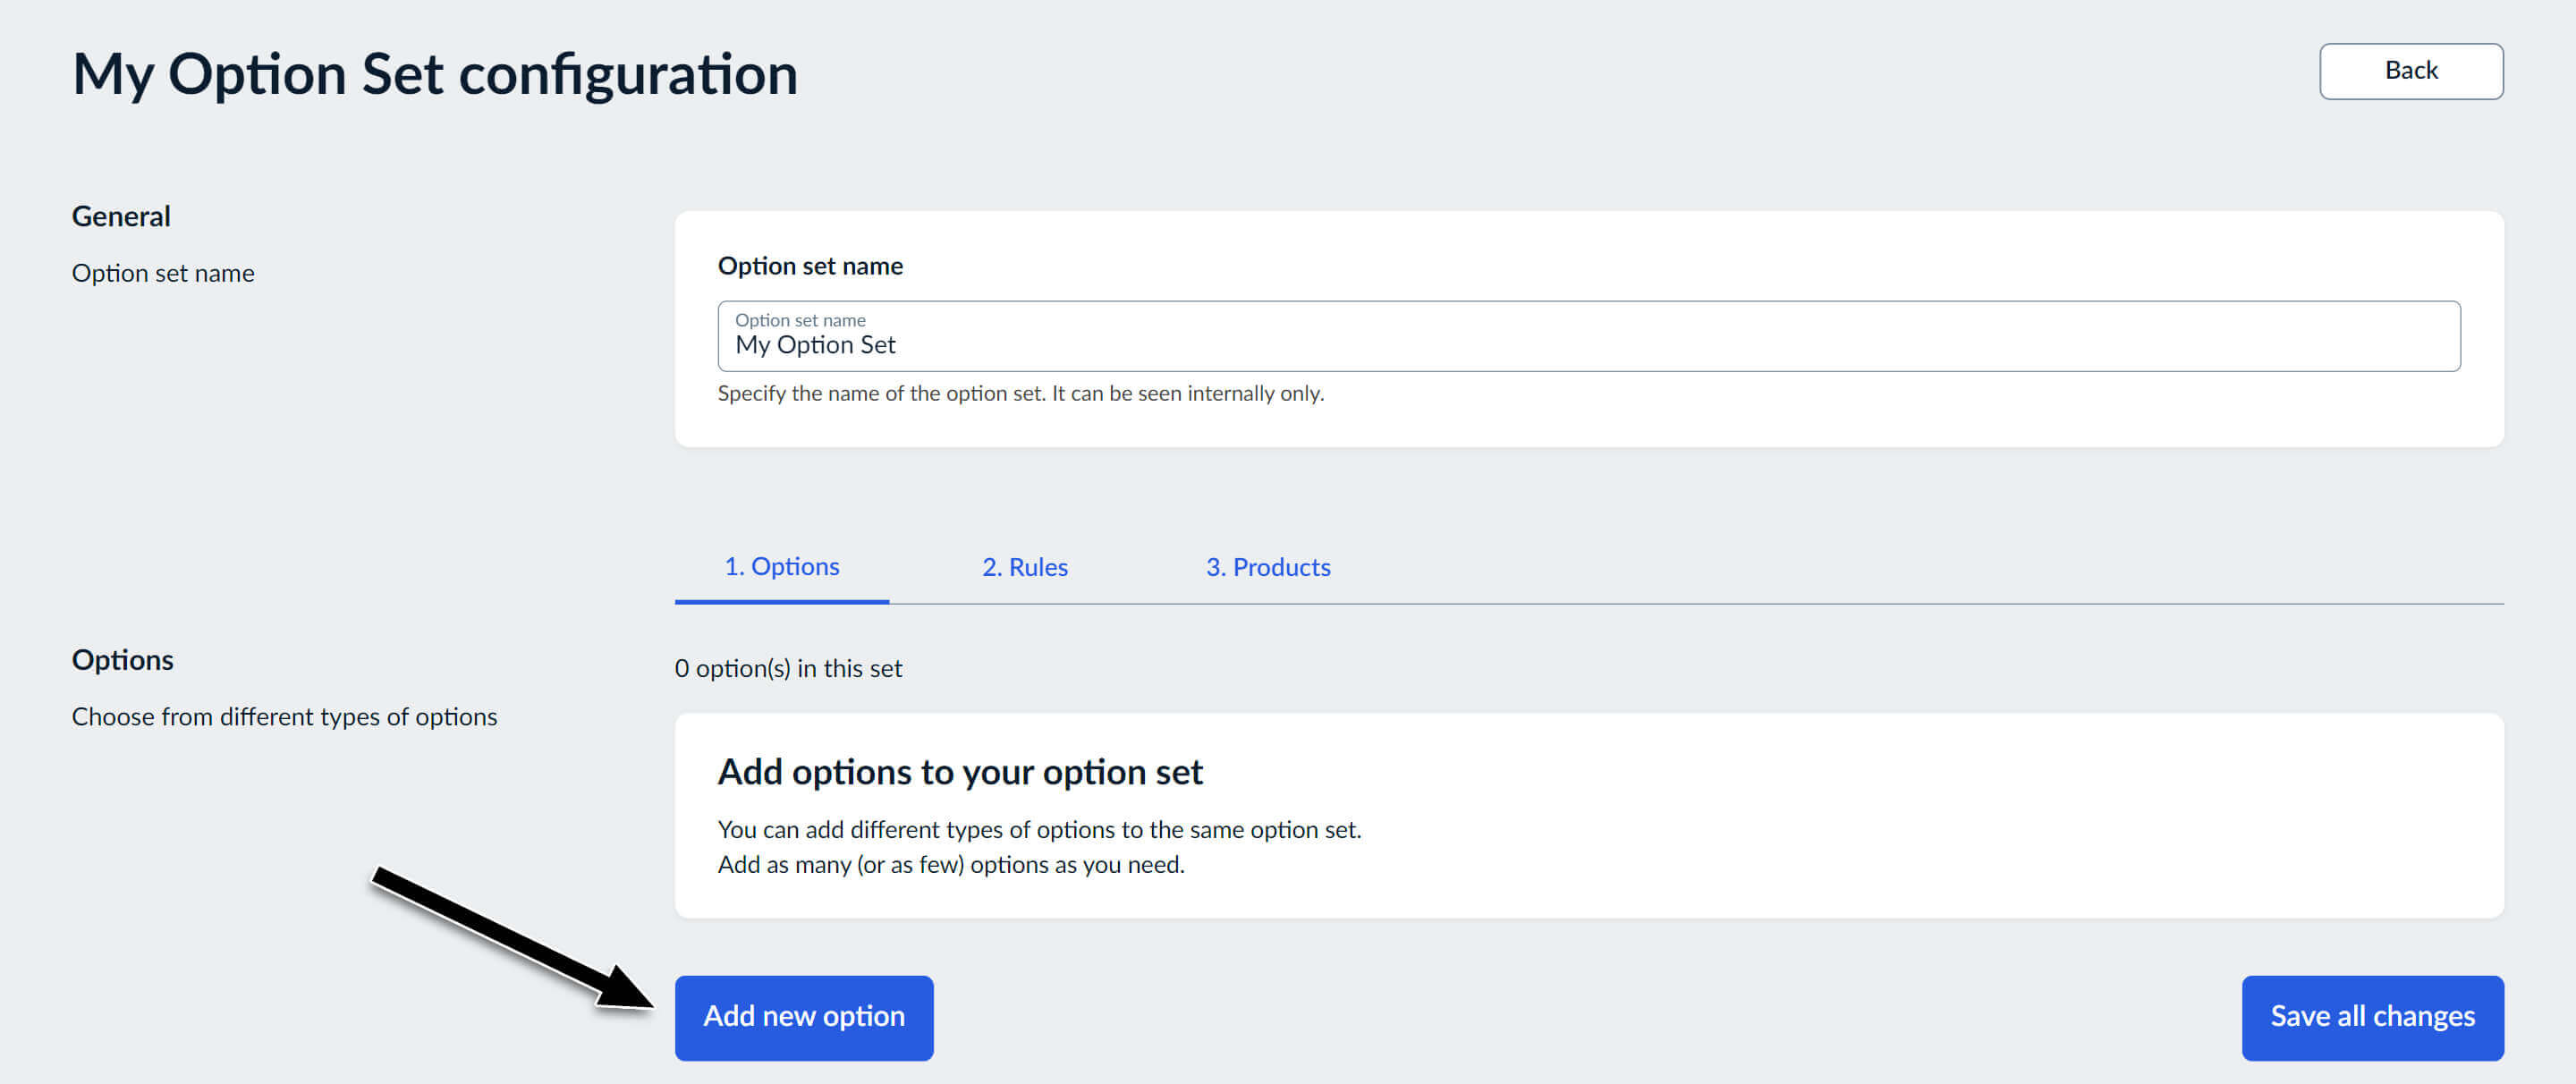
2. Create options & values
Now let's create options and values for the newly created option set.
You can create the following types of options:
- Checkbox is an input type that allows a client to select one or more options. It shows up as a square box that is supposed to be ticked/checked to be activated. It's possible to specify the min/max selection limit for that type of option.
- Radio button is an input type that allows for selecting only one option value at a time. It renders as small circles that are filled or highlighted when selected. Please note that it's impossible to unselect a radio button, it's only possible to switch between the values.
- Dropdown is an expanding menu that allows a client to select one value from a predefined list.
- Swatch is an input type that allows you to add samples of options you offer as a palette of colors or images. When a customer selects the swatch, it is outlined as the current selection.
- Multi-select swatch is a palette of colors or images that allows for selecting several option values at the same time.
- Button is a graphic/text box, i.e it's an outlined area with the option value title inside. A customer should click it to select an option value. This input type allows selecting only one value at a time.
- Text box shows up as a section on a page that allows a user to enter a text. This input type is used for one-line text only.
- Multi-line text box is a section on a page that allows a user to enter multi-line text.
- Number field is a section that allows a client to enter numbers only.
- Date picker adds a calendar interface to a product page and allows a client to select a particular day. With that input type, you may limit the available date ranges.
- File upload is an input type that allows a client to upload images, text, or audio files.
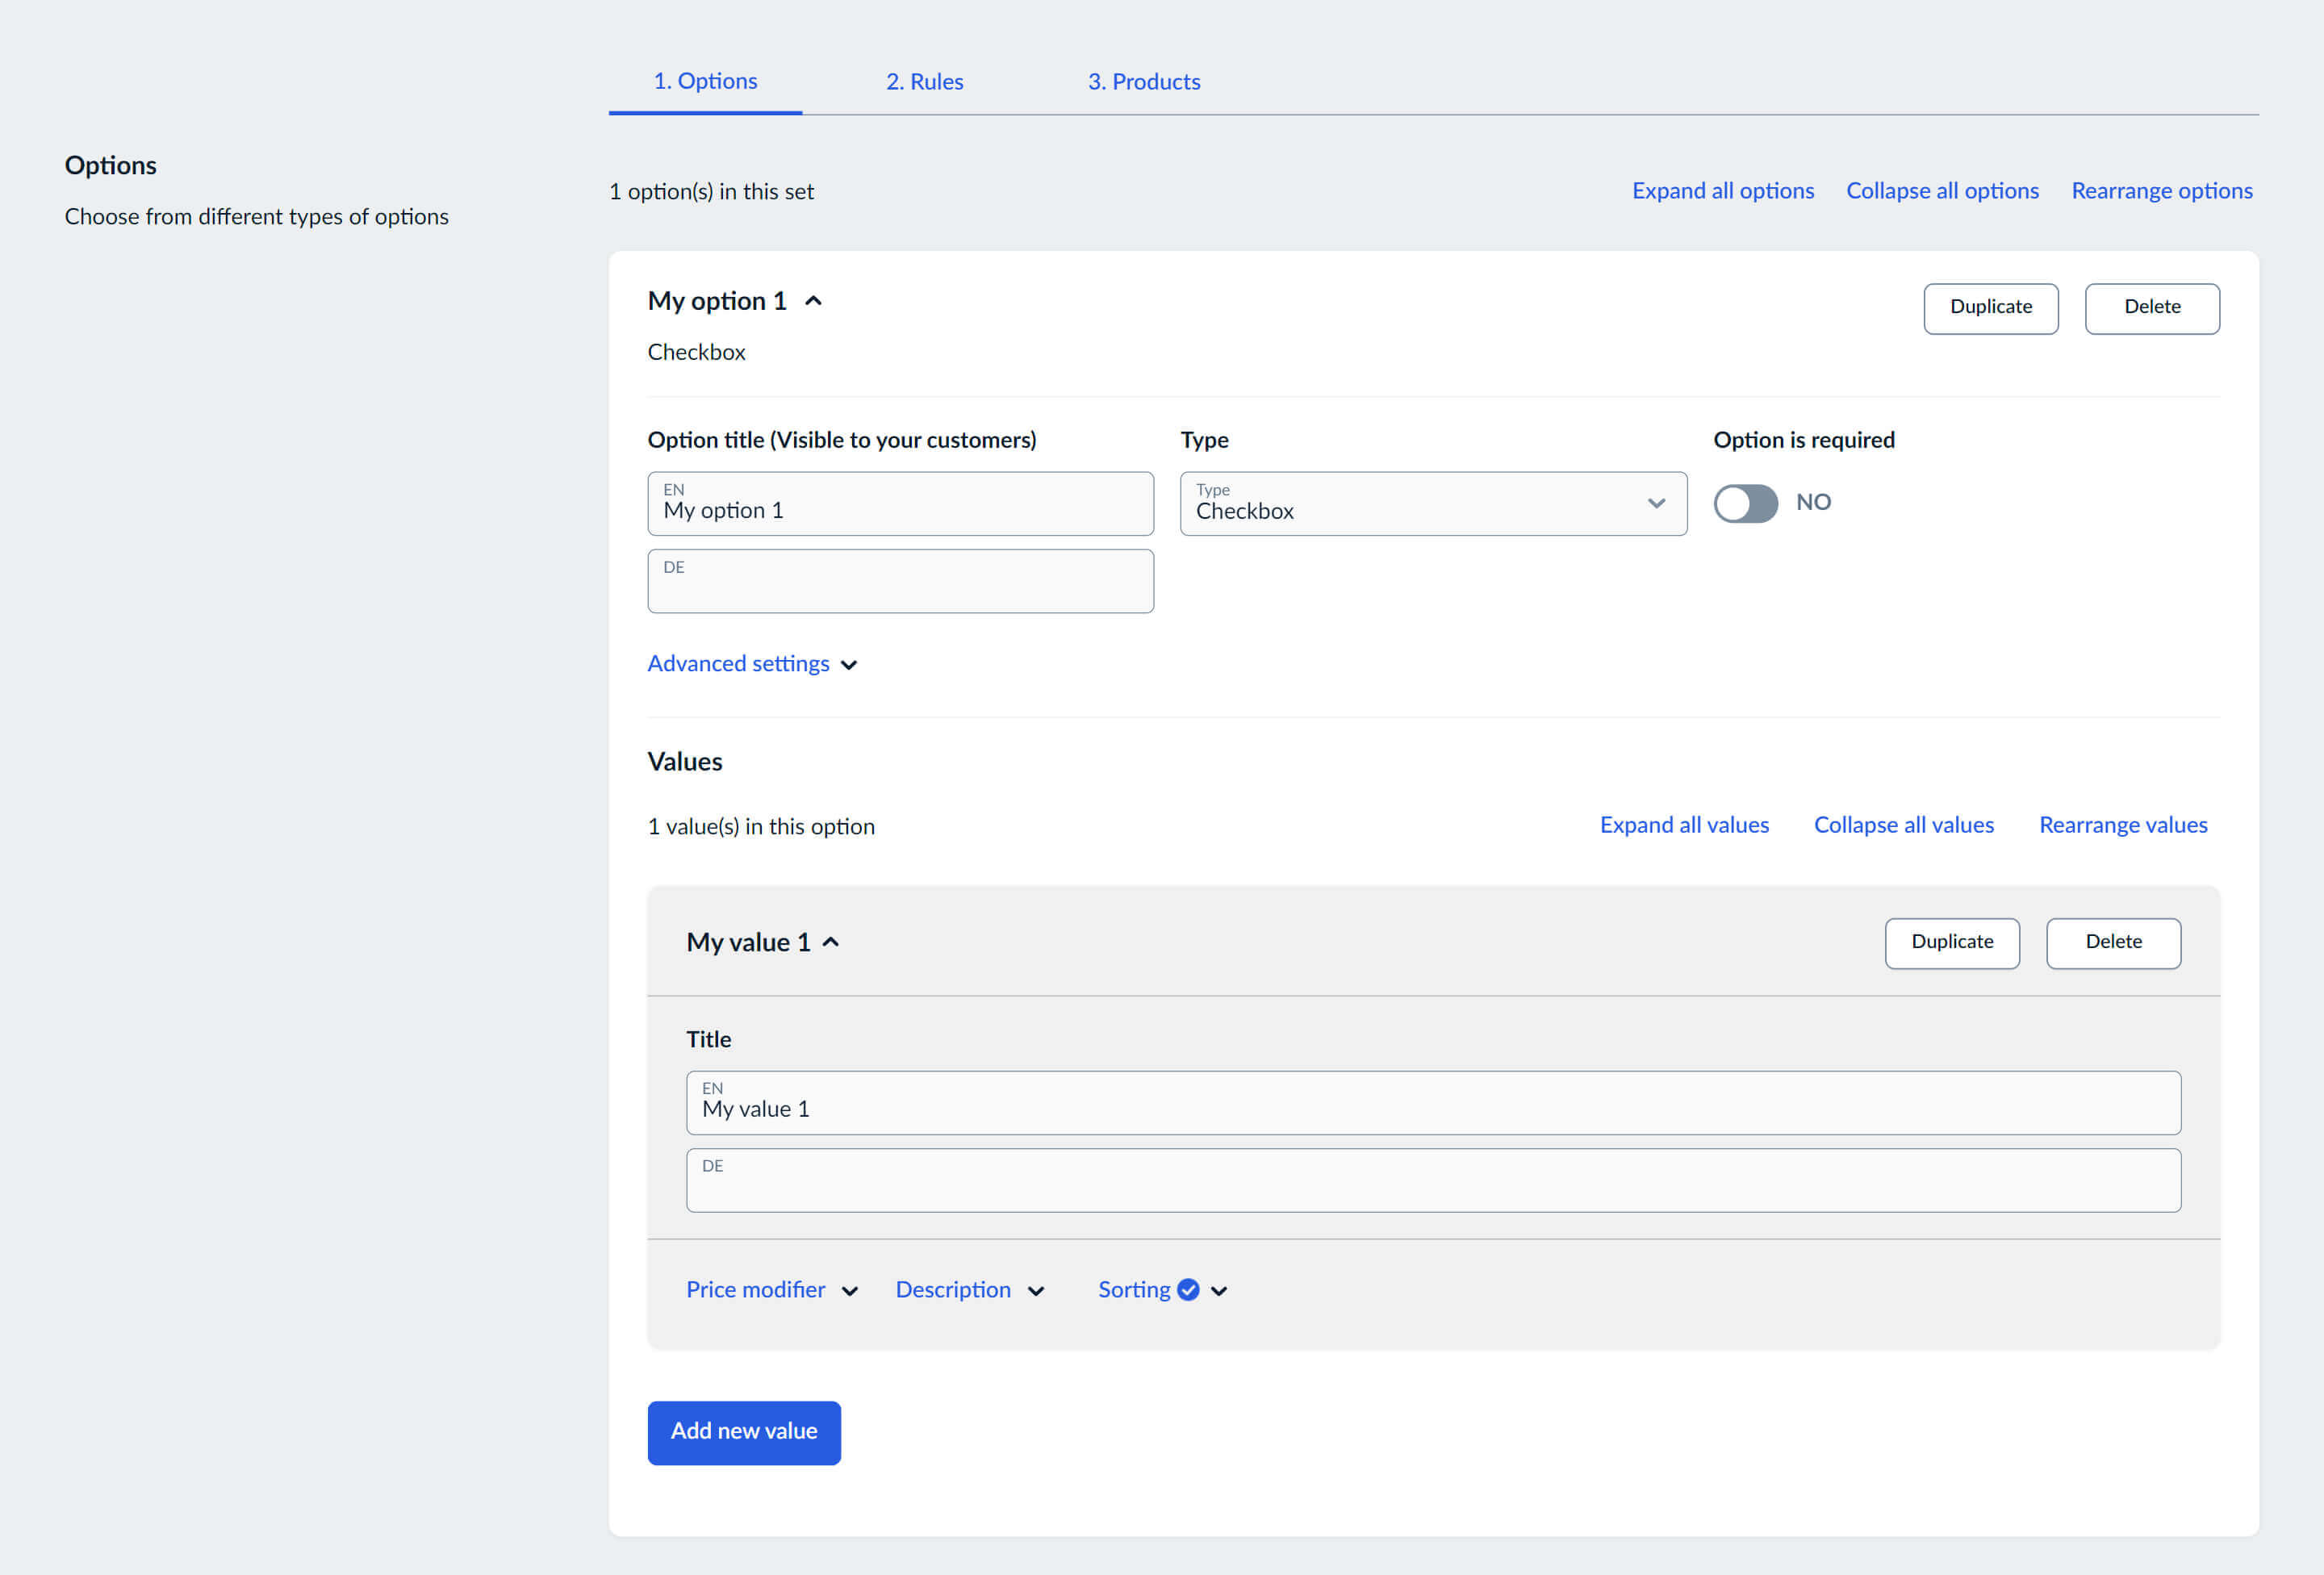
For every value, by using the buttons below the value title input field, you can additionally:
- Add a price modifier
- Add a description which will be shown as a tooltip
- Change sorting
For the "Swatch" option type you can additionally:
- Specify up to 3 colors
- Upload an image
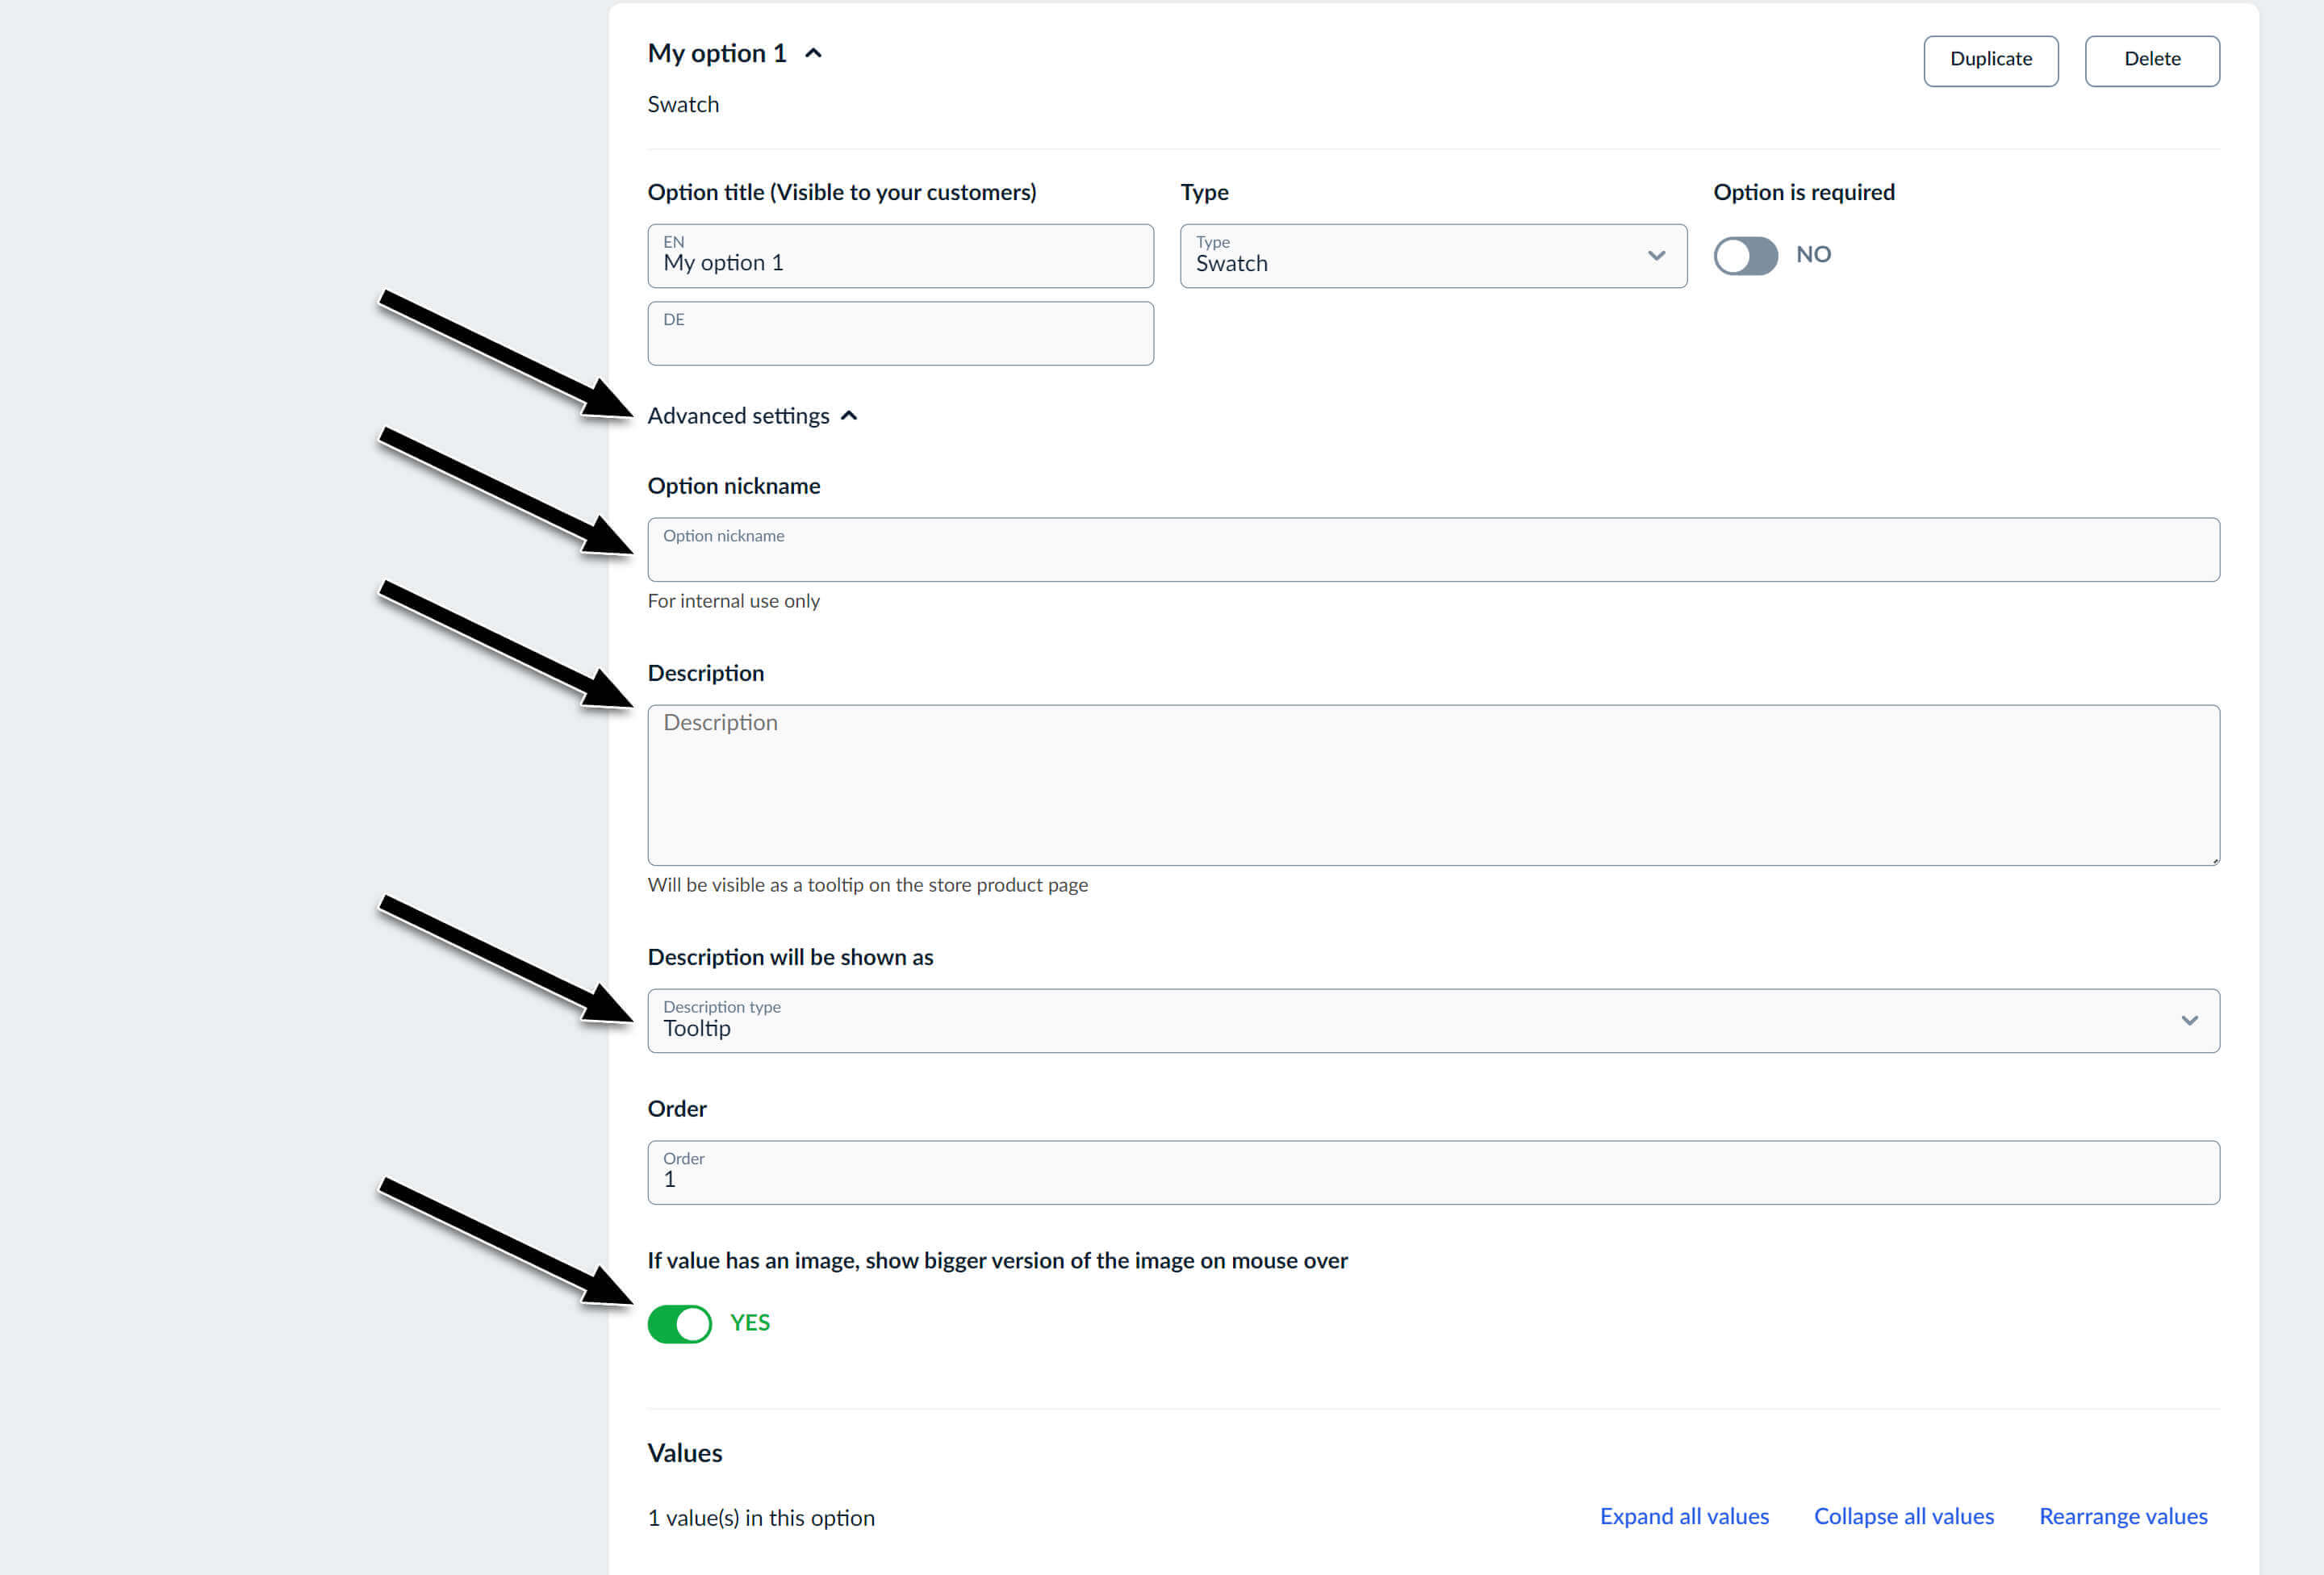
3. Add option description
Once we created an option, we can modify the advanced settings and do the following:
- Set option nickname for internal use. This helps if you have a lot of options which titles are similar and you want to differentiate them somehow
- Set option description which can be shown as a tooltip or as text below the option title
- Change option ordering
- Specify, if you want that values with images ("Swatches"), on mouse hover, show bigger image
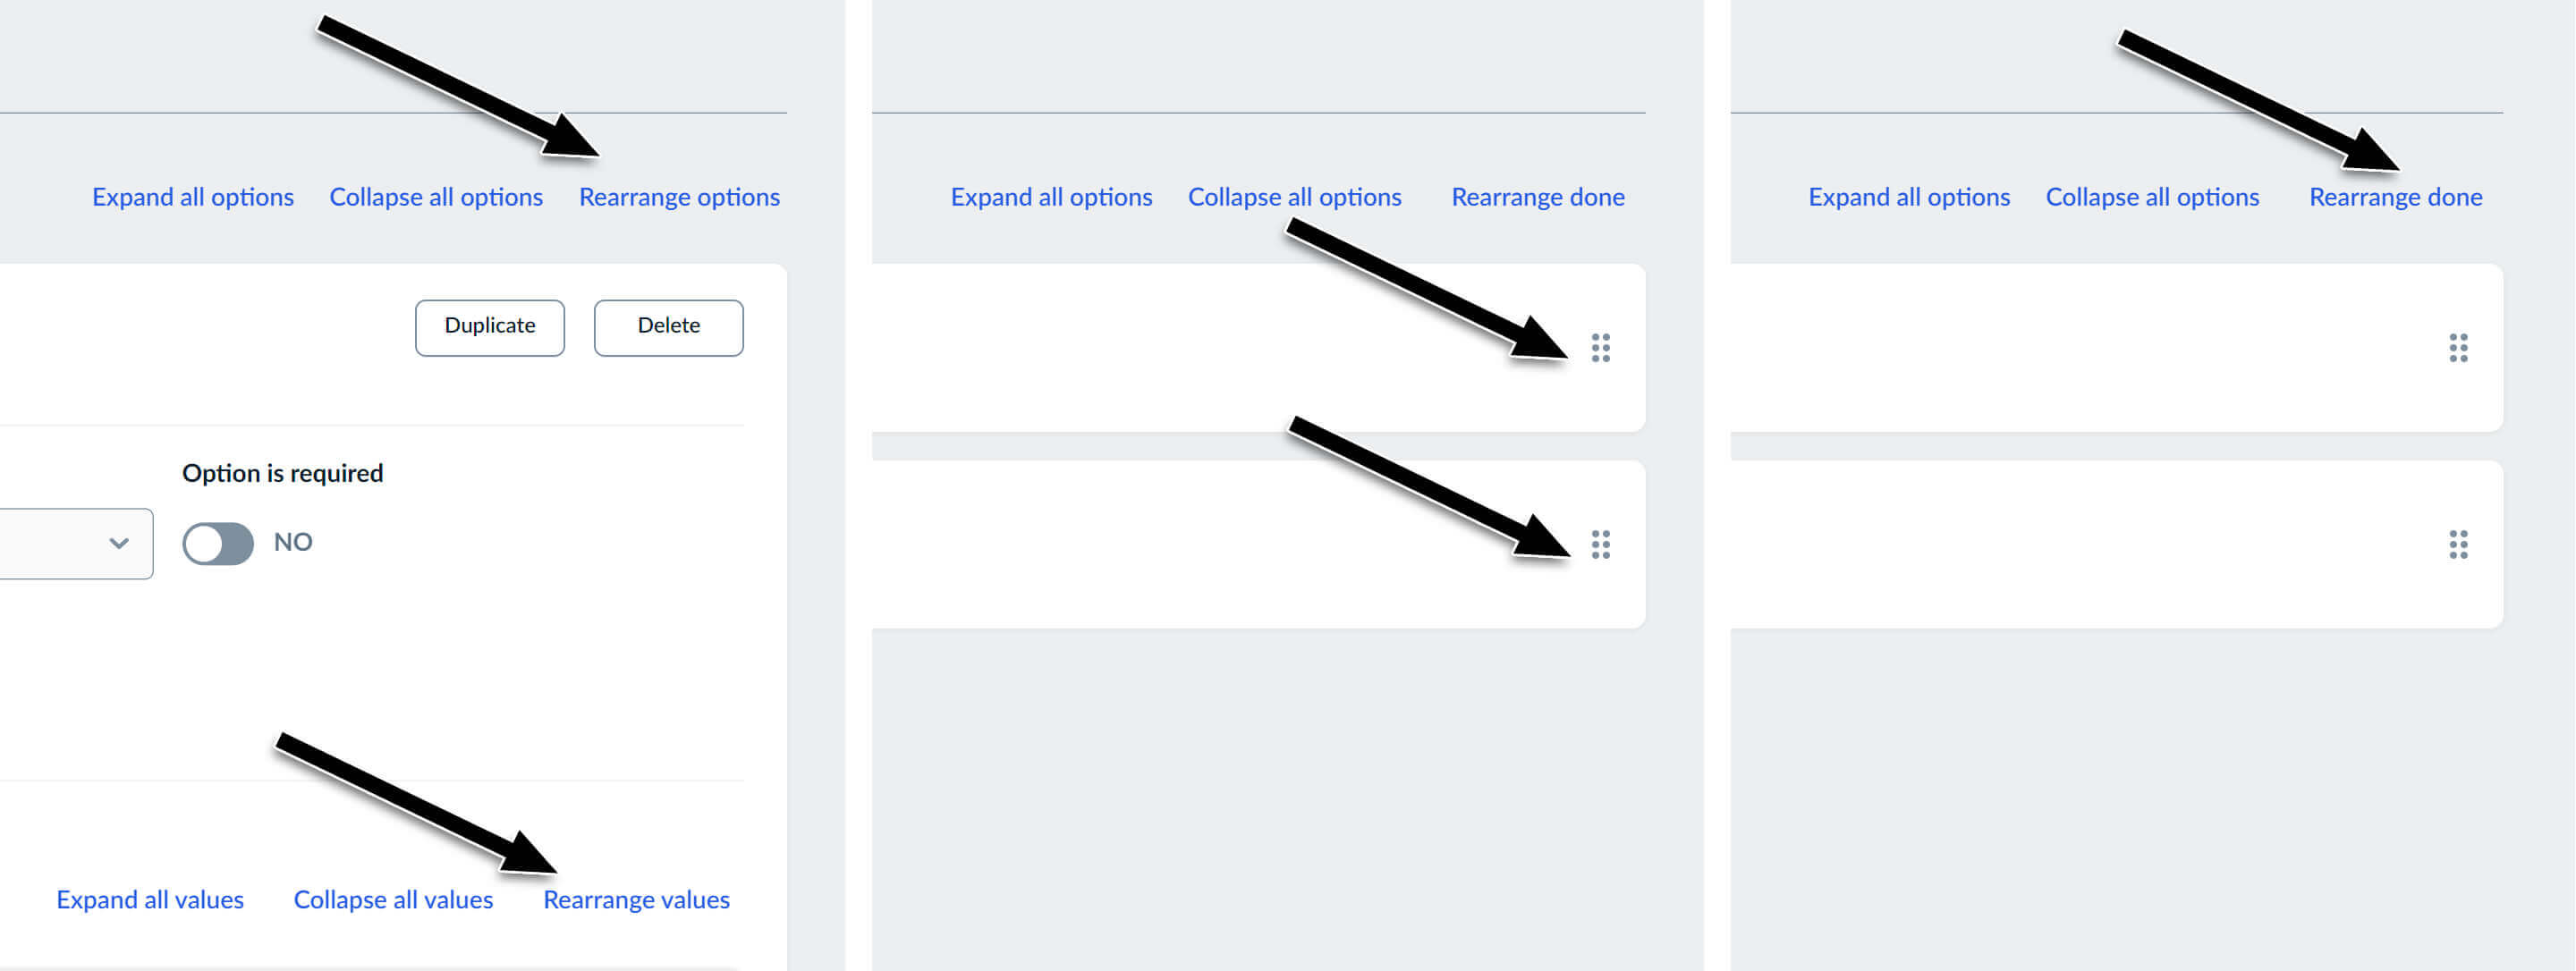
4. Rearrange options and/or values
You can quickly rearrange both options and values. To do so, you need to:
- Activate the rearrange mode, by clicking on the "Rearrange options" or "Rearrange values" button in the right corner.
- Options/values will collapse and you will see handles on the right side. Drag*drop options/values you want to rearrange.
- Once finished, confirm the new order by clicking on the "Rearrange done" button in the right corner.
5. Duplicate option/value
You also have the option to speed up your setup by duplicating options or values by clicking on the "Duplicate" button.
6. Create rule
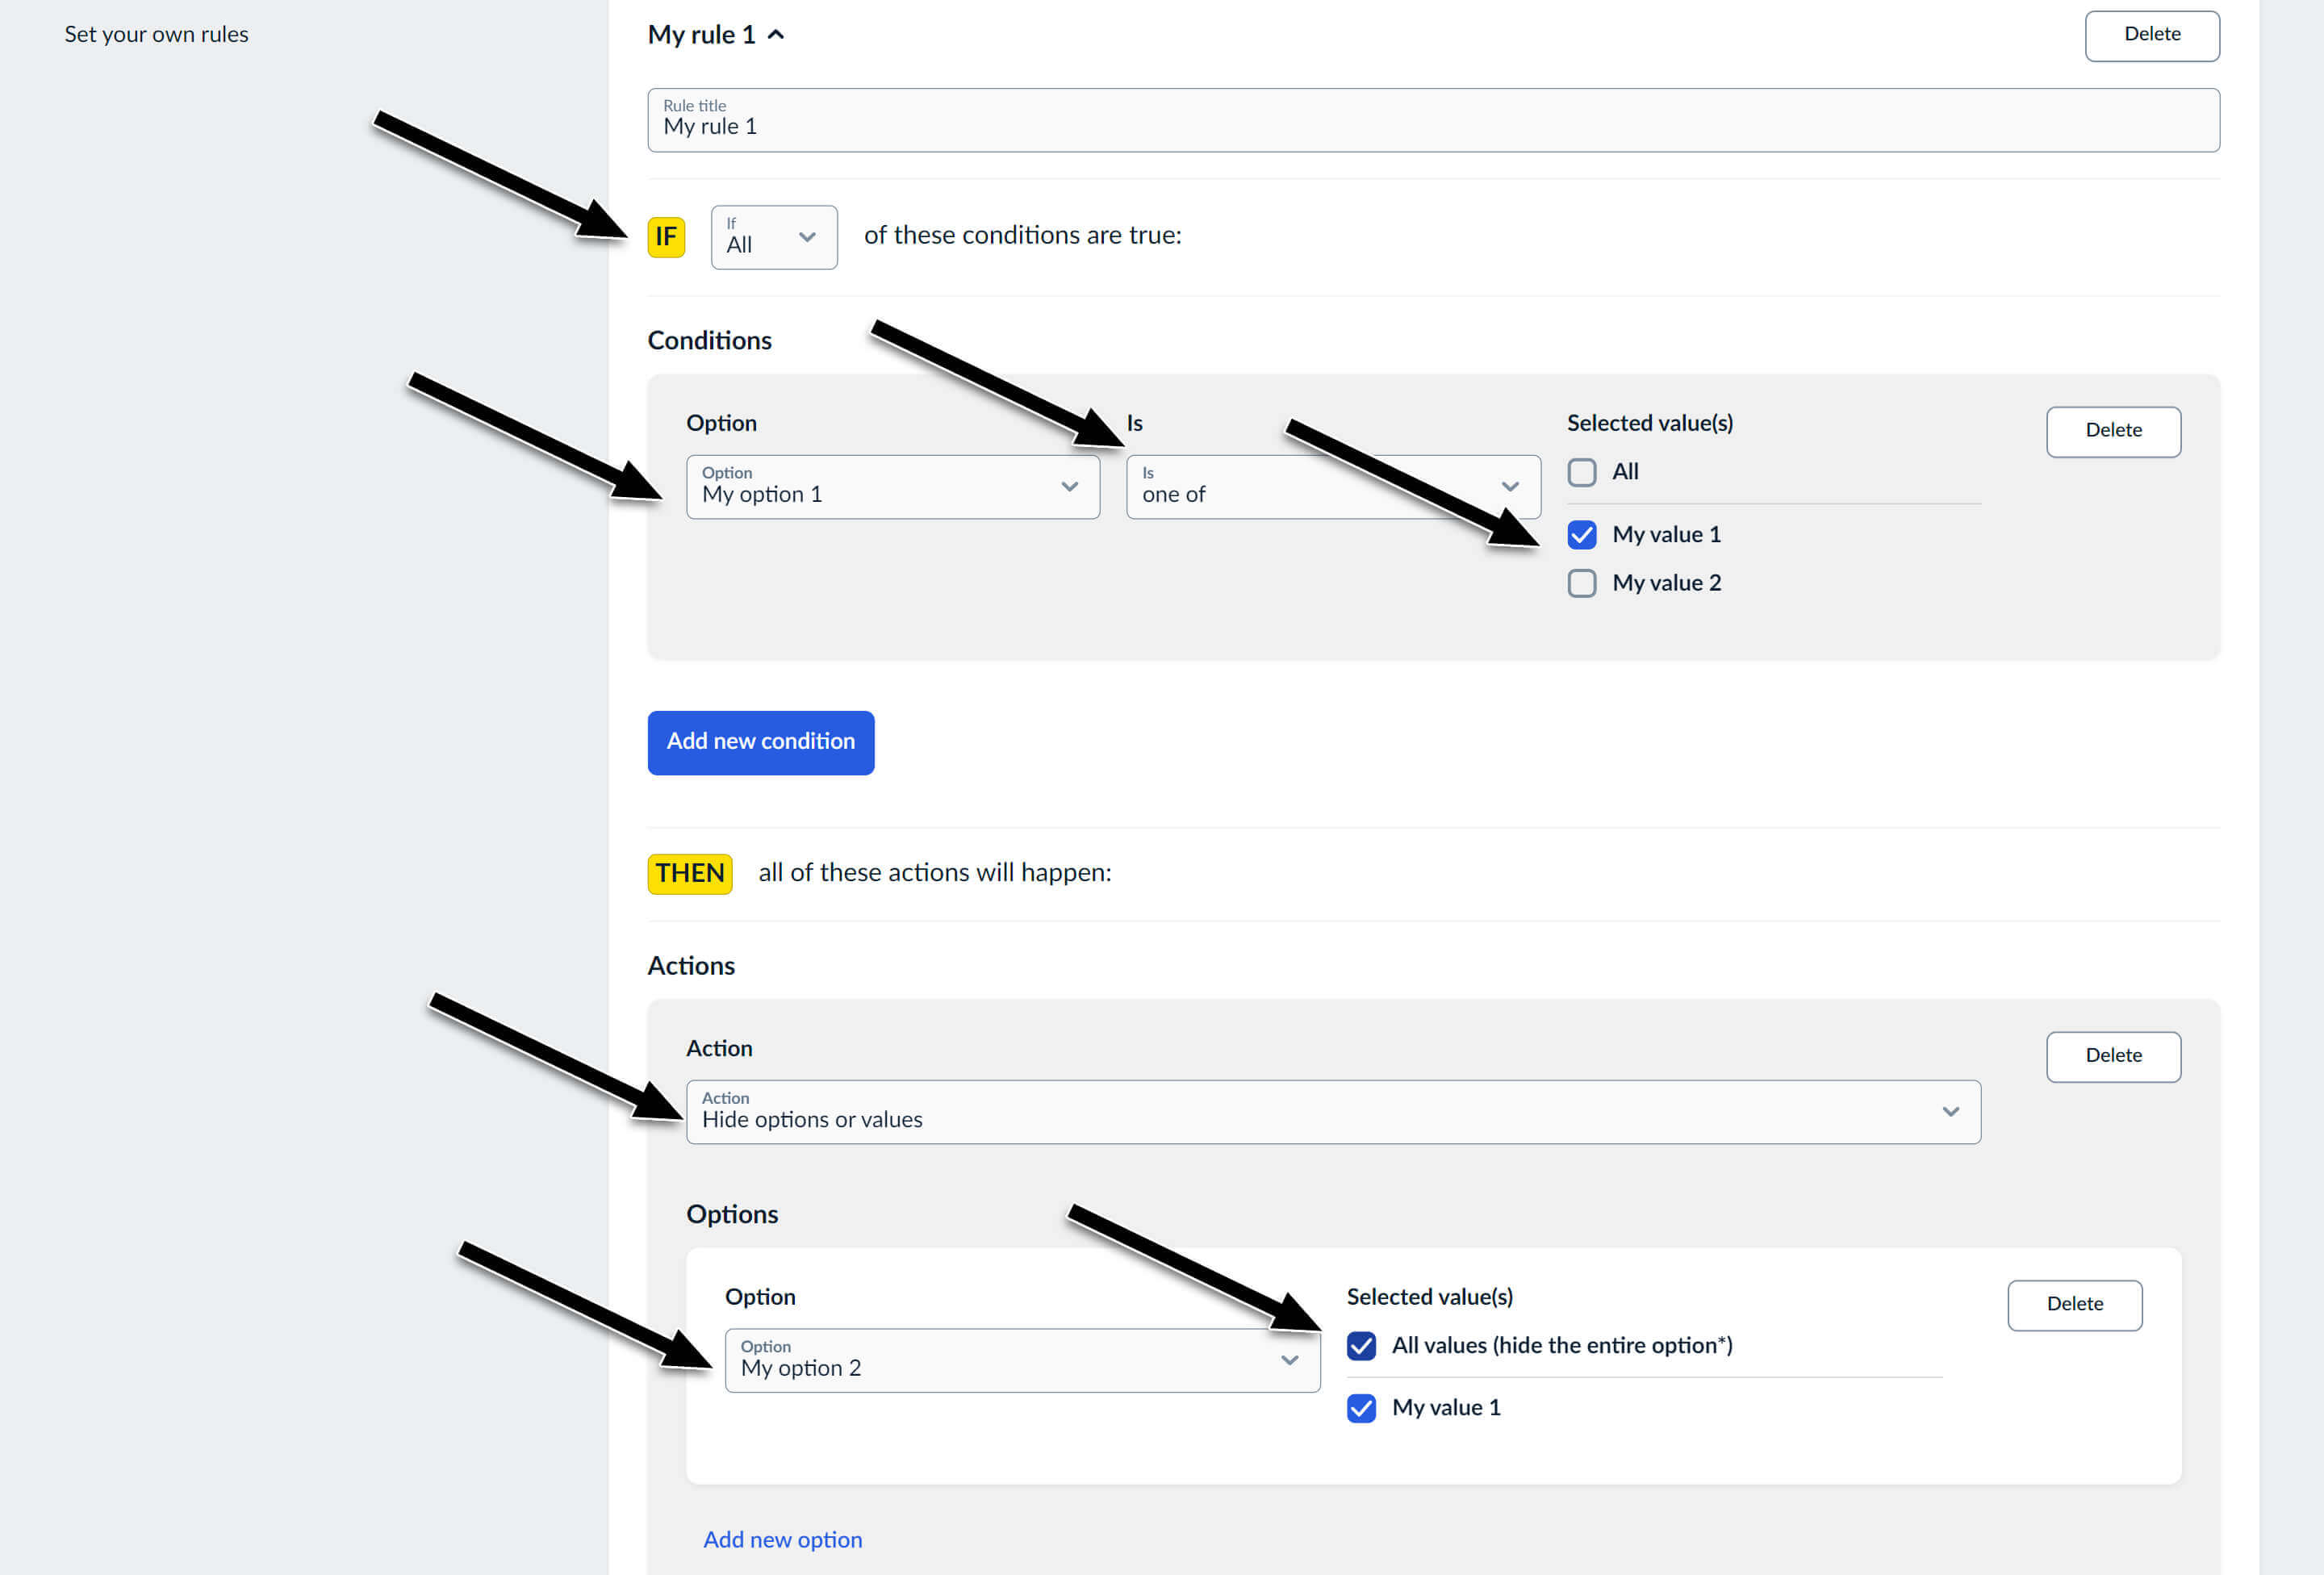
Now once we configured and saved all values and options, we can proceed to the rules and add some visibility logic to our options/values. To do that, we will start by creating a rule.
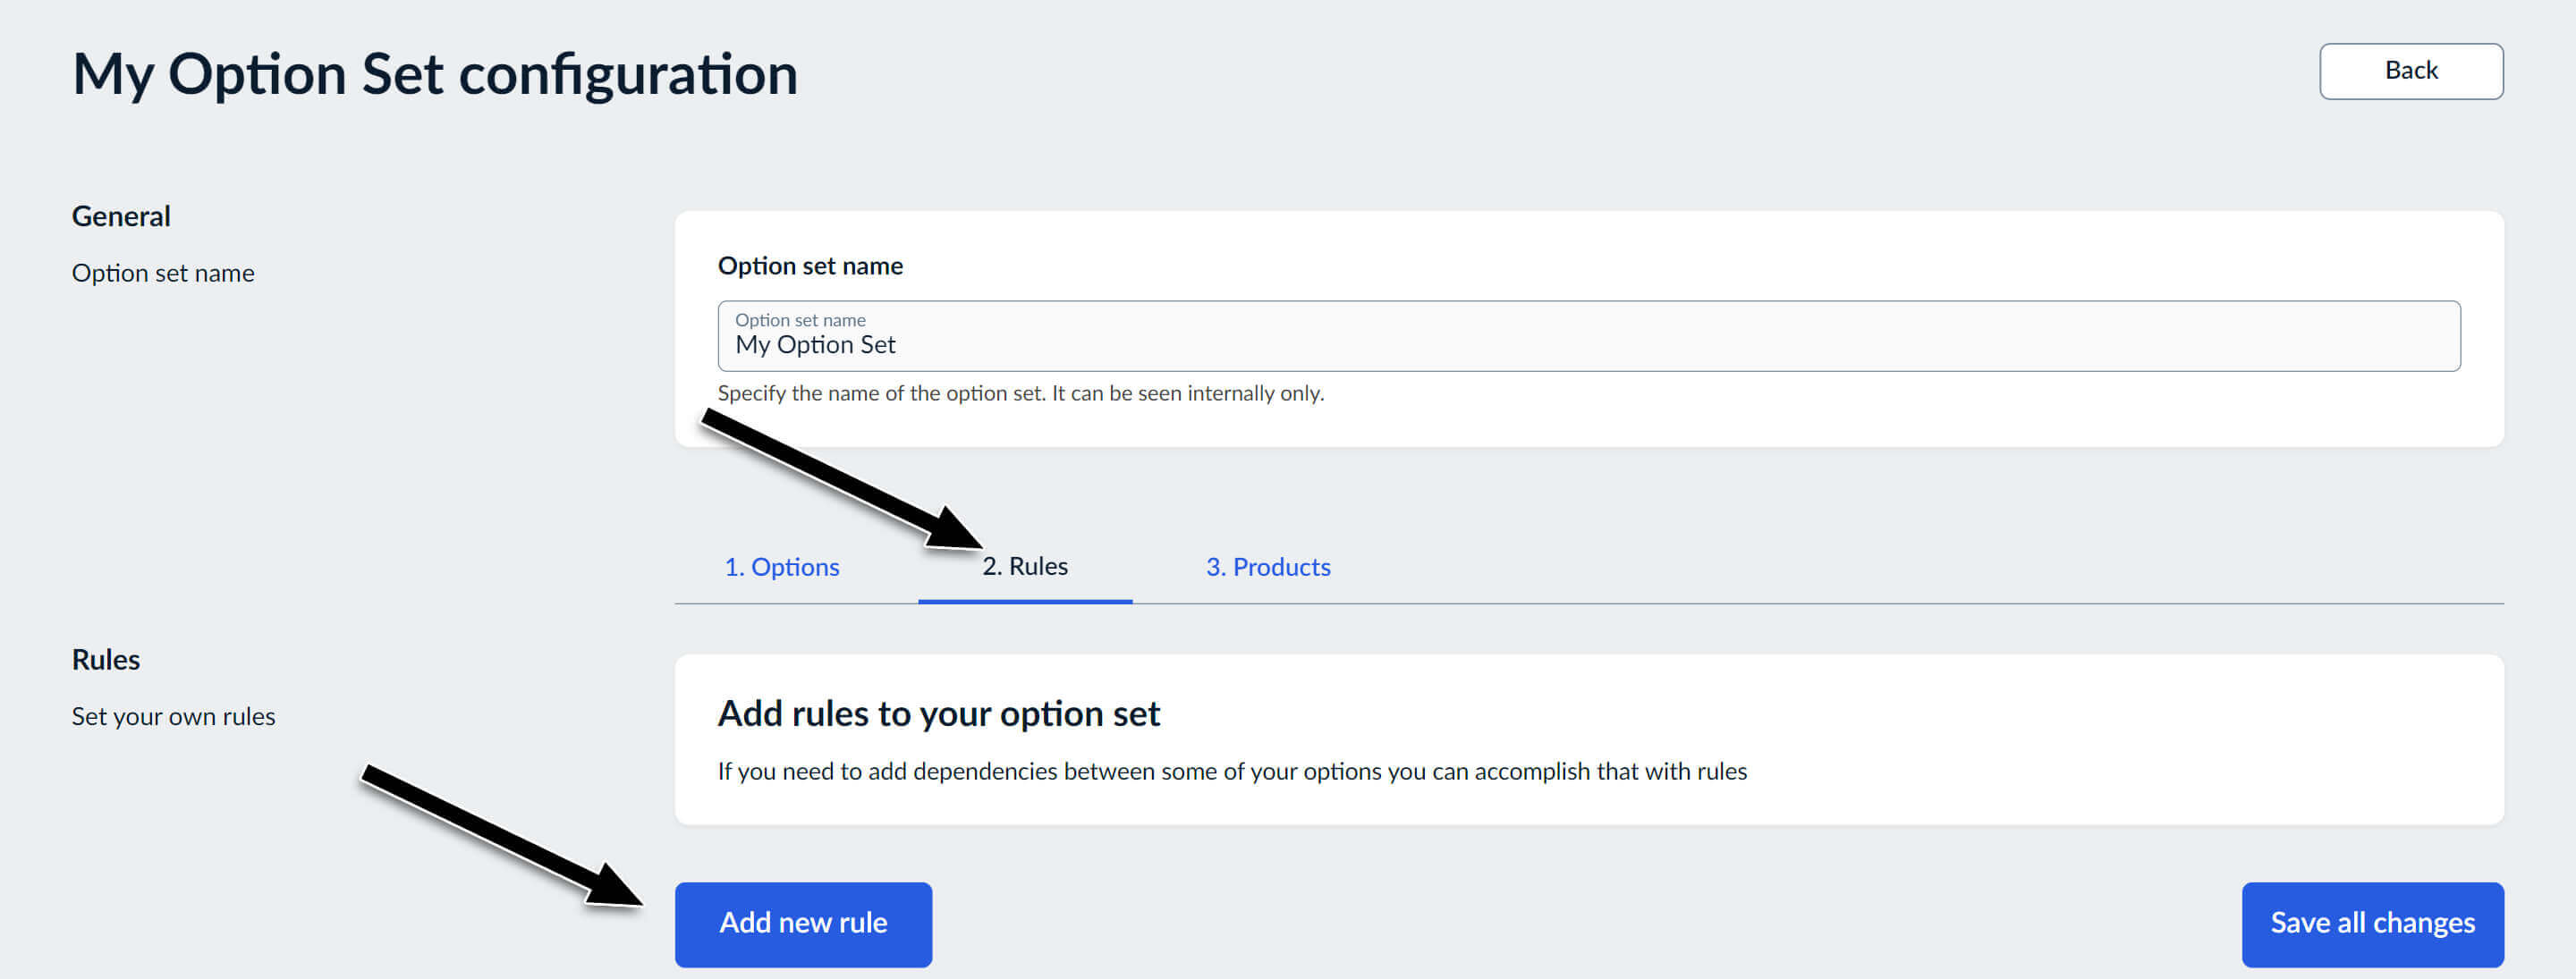
In this rule we will define a condition and an action that should happen if the condition is fulfiled.
The condition says: IF "My option 1" is set to "My value 1" THEN hide all values in "My option 2", hence hide the option completely.
You can create as many rules as you like to accommodate your use case.
7. Apply product set to a product
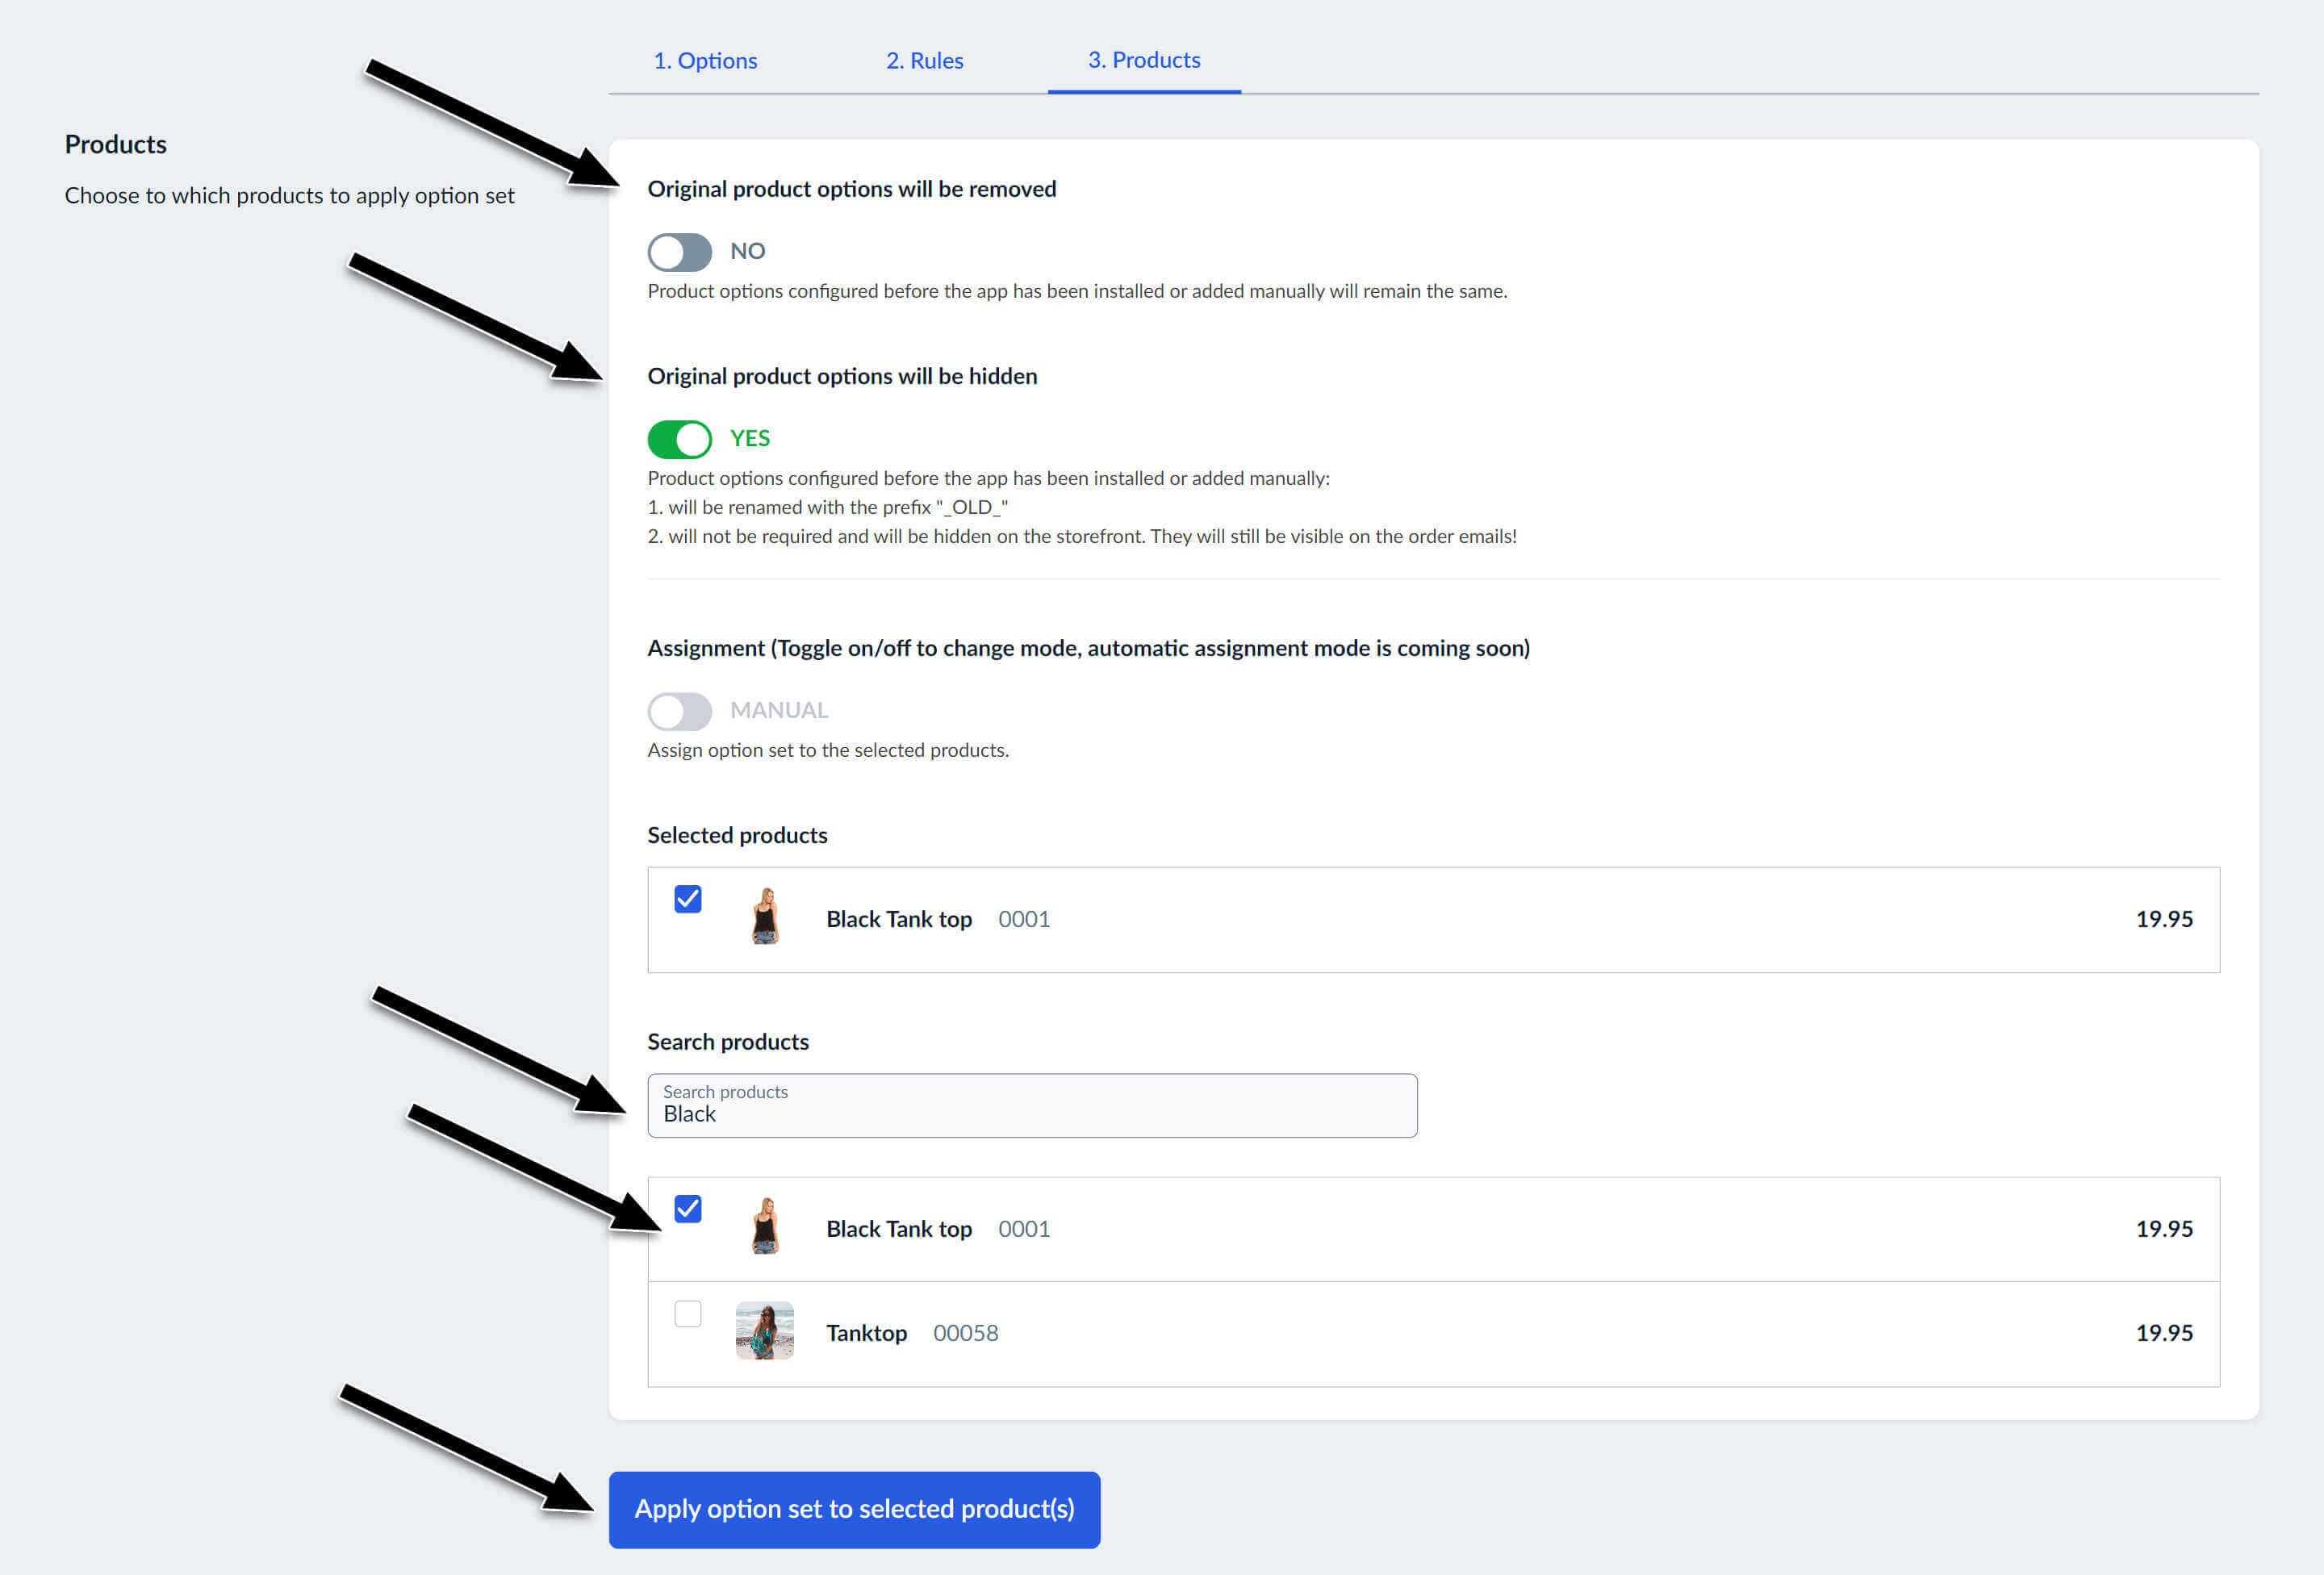
Once the options and rules are configured, we can finally assign the product set to one or multiple products.
Assignment can be done few ways with help of toggle(s).
If you want to assign an option set to a product that does not have any options defined, you can safely set the "Original product options will be removed" toggle to "YES"
If you want to assign an option set to a product that already has some options defined, you have the following options:
- Set the "Original product options will be removed" toggle to "YES". This will make sure that all previously defined options for products are deleted. Because you might also have some variations defined, because of the options change, they will be deleted to avoid possible conflicts. Important to say here is that, if you have imported the option set from a product and you are assigning it back to the same product, you are safe to use this option because variations will stay intact.
- Set the "Original product options will be removed" toggle to "NO". You will then see another
toggle "Original product options will be hidden".
- If you set it to "YES" you can keep already defined options, but hide them on the product page
- If you set it to "NO" you can keep already defined options and simply add a newly defined option set. In this case you can not configure ordering, because new options will always be added as last ones.
Once you choose your strategy, you can search for products, select and apply the option set by clicking on the "Apply option set to selected product(s)" button.
Technical limitations
Dropdown, Radio, Button / Size, and Swatch types will be hidden on the product page, however, they will still be visible on the cart and order page. This is due to a technical limitation of the system, and not the app itself, which is not allowing an empty value for this sort of option types.
Workaround: Add a new value with the label 'Not selected' or similar, to Dropdown, Radio, Button / Size, or Swatch option type, and set it as a default. This way, if the whole option is hidden, the value visible on the cart and order page won't be confusing to the customers.
8. Storefront preview
The benefits of advanced product options
Advanced product options can have a number of benefits for businesses, including increased conversions, improved UX, and increased customer satisfaction. By allowing customers to customize their purchases and choose options that are relevant to them, businesses can make the shopping experience more personalized and enjoyable. This can lead to more satisfied customers and a higher likelihood of repeat business.
More info & FREE Trial