FAQ

Frequently Asked Questions

Advanced Product Options

Create dependable (conditional) product options, make them required or not, set custom prices, apply rules. Add options to products easily by selection. You can find just the right types for your options from color swatches, dropdowns, radio buttons, checkboxes, text boxes, and more. Apply dependencies to your product options. Specify how a selection of one option can show or hide some other product's options. Add options and value descriptions.

This app allows you to quickly create dependable (conditional) option sets which you can apply to any product in the store. You can also import the options from existing products and add conditional logic and custom rules based on the product needs. This will help in reducing the initial size of the options list, and having the product page cleaner while keeping the customers more engaged as they will always see only the correct options set. No more long product pages with dozens of options that confuse the customers.

  1. First, you need to create new Option set
    1. You can create that by importing an existing option set from the product
    2. You can create a brand new set
  2. You add your options, or if imported adjust them
  3. You add your rules and conditions
  4. You select to which products to assign the set
  5. That is all! :)
  1. Make sure you have assigned product(s) to your option set
  2. Make sure to always click on 'Save All Changes' blue button to save all updates.

Here are the definitions of certain terms that you will find in the app:

  1. Checkbox is an input type that allows a client to select one or more options. It shows up as a square box that is supposed to be ticked/checked to be activated.
  2. Radio button is an input type that allows for selecting only one option value at a time. It renders as small circles that are filled or highlighted when selected. Please note that it's impossible to unselect a radio button, it's only possible to switch between the values.
  3. Dropdown is an expanding menu that allows a client to select one value from a predefined list.
  4. Swatch is an input type that allows you to add samples of options you offer as a palette of colors or images. When a customer selects the swatch, it is outlined as the current selection.
  5. Button is a graphic/text box, i.e it's an outlined area with the option value title inside. A customer should click it to select an option value. This input type allows selecting only one value at a time.
  6. Text box shows up as a section on a page that allows a user to enter a text. This input type is used for one-line text only.
  7. Multi-line text box is a section on a page that allows a user to enter multi-line text.
  8. Number field is a section that allows a client to enter numbers only.
  9. Date picker adds a calendar interface to a product page and allows a client to select a particular day. With that input type, you may limit the available date ranges.
  10. File upload is an input type that allows a client to upload images, text, or audio files.

Automated Customer Reviews

This app will send automated follow-up email when your clients receive orders. This will help you improve / collect ratings & customer feedback on many review sites at once.

The app will minimize chances of bad reviews on Facebook, Google reviews, Yelp, by redirect unhappy customers to private feedback form.

Animated Multi-language Product Labels & Badges

Automated Product Labels & Badges app offers a perfect way of organizing, scheduling, and automating all product labels, ribbons, and badges that one store needs. In just a few clicks you can define your labels and capture customers' attention with vital info about the product and its benefits, which leads to more conversions.

Since mobile screens are by definition small, for better user experience, we do not want to cover all product images entirely, but rather keep the labels on the front image.

What is Mega Menu?

Mega Menu is a user-friendly, highly customizable, fully responsive category navigational menu which helps the customers easily navigate through your Categories. It will improve the engagement rate and overall user experience of your store.

Mega Menu is relying on instantsite elements in order to render the menu for the following positions: 'Replace original header (only for instant site)', 'Top of the page', and 'Bottom of the page'. In case you are using a custom integration, or you want to show the menu on a specific place on your page, you should use 'Before custom element' and 'After custom element' positions.

AOV Progress Bar

When it comes to increasing your store's average order value (AOV), there's no better tool to use than AOV Progress Bar. AOV Progress Bar is an interactive progress bar that changes whenever customers add or remove items from cart. This motivates customers to subconsciously add more items to their cart in order to qualify for discounts.

The key difference between AOV progress bar and free shipping bar is that progress bar provides visual indicators to motivate users to add more cart items.

Go beyond offering free shipping to your customers with multi tiers discounting. For example, you can configure discounting in the following manner:
- Free Shipping if Cart Amount is greater than $50
- $10 Off if Cart Amount is greater than $100

Auto Currency Switcher

If your business is spread across multiple countries, you would always want the visitor to be able to see the displayed price in their home currency to save your foreign customers from pain of mathematical calculations. Using the app, the customers can see the prices in their home currency automatically.

Charges will always be made in your default store currency. Displaying prices in different currencies simply lets your customers know the prices of your products/services in their local currency without having to convert them manually.

The app will detect the customer's country and show the prices in the corresponding currency. If this currency is not added to your store, the prices will be shown in your store default currency.

Yes, if you selected a position for the 'Button' which is other then 'Hide', visitors will be able to change their currency by clicking on the button and selecting the new currency.

You can change your store defauly currency by going to Regional Settings.

For the currency you want to set manual rates, simply set 'Automatic rates' to 'NO' and then set the value in the input box which will appear. That is all.

Amazon Pay

Amazon Pay enables you to offer Amazon customers an easy, secure, and fast way to check out on your site using the shipping and payment information stored in their Amazon account. Beyond the button, Amazon Pay is also an easy way to integrate Alexa into your commerce strategy and is the place where shoppers manage their payment methods on Amazon.com.

This app helps you to bridge the communication between your store and Amazon Pay and offer you customers ability to pay with a very known and reliable service of Amazon. All you have to do is configure fields above with correct data and you are good to go.

Navigate to Amazon Pay and register your business account. After you successfully created an Amazon Pay account you can continue with instructions below.

Follow this tutorial and you will be able to copy/paste all details. You can also check the official video from Amazon Pay.

Alma - Payment in installments. Simple. Guaranteed.

Alma offers a more flexible shopping experience with split payment. When your customers choose split payment, they manage their expenses as they wish and are more easily tempted by pleasure purchases.

In order to use this app successfully, you must have a valid Alma account. Once you do that, copy the API keys into the fields above and save the changes. You toggle between Test and Live mode in case you want to test the connection to the Alma first.

Amount of purchases
  • P2X: Only purchases between €50 and €2,000 are eligible for payment with Alma.
  • P3X: Only purchases between €50 and €2,000 are eligible for payment with Alma.
  • P4X: Only purchases between €50 and €2,000 are eligible for payment with Alma.
You can get more info on your Alma dashboard.

As mentioned in the Answer above, if the product price is lower than €50 or higher than €2,000 widget won't be shown because that product is not eligible for payment with Alma.

Zip Payments

Zip is a global payments company headquartered in Sydney, Australia. Founded in 2013, Zip is an ASX-listed (Z1P) pioneer in the buy now, pay later category.

Zip serves:
*Five continents
* 80,000+ merchants
* 9.5 million customers

In order to use this app successfully, you must have a valid Zip merchant account. Once you do that, copy the API keys into the fields above and save the changes. You toggle between Test and Live mode in case you want to test the connection to the Zip first.

Once you mark your order Fulfillment Status as 'Ready for Pickup' or 'Shipped', the app will automatically try to capture the funds for the order.

Yes. Simply mark your order Payment Status as 'Refunded' and the app will automatically try to issue a refund for the order.

Yes. Simply mark your order Payment Status as 'Cancelled' and the app will automatically cancel it and try to issue a refund for the order.

We suggest the following link. Choose your country/region and then locate the "Help" link in the top menu.

PayPlug

PayPlug is the first omnichannel payment solution designed for SMEs.

PayPlug serves: 15,000+ customers

In order to use this app successfully, you must have a valid PayPlug account. Once you do that, copy the API keys into the fields above and save the changes.

The minimum cart amount has to be equal or greater than 1 and smaller or equal than 20000.

Viva Wallet

Viva Wallet is the first European entirely cloud-based Neobank, using Microsoft Azure with presence in 24 countries in Europe.

Viva Wallet is a Principal Member of Visa and Mastercard for acquiring and issuing services.

In order to use this app successfully, you must have a valid VivaWallet account. Once you do that, please follow the instruction.

Card payments by your customers, can be accepted in any currency and the amount will be converted to your Viva Wallet account currency with the card schemes' daily exchange rate. Note: Your e-shop's currency must match your Viva Wallet account's currency.

The minimum cart amount has to be equal or greater than 30.

Upsell & Cross-Sell Kit (Product Bundles and More)

This app allows you to create product bundles for products of your choice with a specific discount (fixed amount or percentage). Once a bundle is created, it will be shown on the selected products pages in the position you selected, so that visitors can easily buy the bundle. After the visitor has added the bundle to the cart, a discount will be applied at the checkout.

For 'Frequently Bought Together' sell kit, it is a recommendation to select up to 3 products for a bundle.

For 'Cart Page Upsell' sell kit, it is a recommendation to select 1 or 2 products for a bundle.

Anything more than that is usually too much for a potential customer.

It is a recommendation to choose products from similar categories or which are connected on some level.

Example 1: T-shirt + Sweat Shorts + Socks

Example 2: Sneakers + Ball + Gloves

In case you want to disable the discount at the checkout, usually, that means that the whole bundle should be disabled. Simply toggle the button next to that bundle and that is it. It won't affect customer carts any longer.

You can create multiple bundles, however, only 1 bundle will be shown in the form of a widget to the visitor on the product page. The rest of the bundles, will, if the visitor fulfills the requirements, be visible at the checkout only.

You can create multiple kits, however, only 1 bundle will be shown in the form of a popup to the visitor on the cart page. The rest of the kits, will, if the visitor fulfills the requirements, be visible at the checkout only.

Therefore, the recommendation is to have only 1 'Cart Page Upsell' kit active at the time.

No. It is not recommended to swamp visitors with too many discount offers and popups. Therefore, if, for product detail page already exists 'Frequently Bought Together' bundle, the Add to Cart Upsell won't be shown.

In case you created multiple sell kits which include the same product, the checkout total will show all discounts that match selected products.

Examples:

1. You created 2 'Frequently Bought Together' bundles and both have at least 1 of the same product. If the user adds both bundles to the cart, two discounts will be applied.

2. You created 1 'Frequently Bought Together' bundle and 1 'Cart Page Upsell' but you used the same product. If the user adds both bundles to the cart, two discounts will be applied.

The recommendation is not to include the same product in multiple bundles in case you want to avoid the behavior described above.

Another solution is to deactivate one sell kit and run them separately instead of parallelly.

Once activated, the kit will track the number of the purchase and it will show them in the kit card as 'Purchases' count.

Discount Spin Wheel of Fortune (Spin to Win)

Coupons can be created as exaplained here.

Please make sure that you have selected at least 1 coupon in the 'Coupons' section.

Cart Abandon & Reminder Popup

Case 1 (New Visitors):

  1. User has nothing in cart
  2. User adds something to the cart
  3. If, at any given point, the user tries to navigate away (exit intent) or is inactive for XX seconds on mobile device
  4. Modal (Popup) is shown

Case 2 (Returning Visitors):

  1. User has already something in cart
  2. If, at any given point, the user tries to navigate away (exit intent) or is inactive for XX seconds on mobile device
  3. Modal (Popup) is shown

Edit the field "Frequency of showing (per day)" and put a lower number then the default 3.

No, it won't be shown on the "/cart" and "/checkout" routes, as the user is already performing appropriate actions and there is no need to return him back to the start.

Shoppable Stories

By clicking on the 'Select' button next to the product field you will get a search box modal. Type in the search query and you will get product list of enabled products.

In case product image is square or width is much larger than height or you do not want to cut any portion of the image, we recommend that you disable 'Show product images as full screen' for that product

For every product you choose, our app will create a story consisting of product images and optionally product price, description, and title. The story will have as many slides as your product has images.

For every product, there is an option 'Visible' which can be toggled. Simply toggle off when you wish to remove that product from stories slider.

Since stories have to be super snappy and fast, we cache the product data in order to the rendering faster. In case you updated the particular product, just click 'Refresh' button next to it, and we will update the data.

Shareable Cart

The app will insert "Share Cart" button to the page, on the position you specified. As soon as the button is clicked, the popup will appear, where customer will get shareable cart link, which can be copied to a different device or shared via social networks. There will also be a QR code available, to easily share cart across multiple devices.

As soon as user adds something to his cart, button will appear on the position you choose.

TikTok Shoppable Slider & Instagram Shoppable Wall

Our application allows you to create fully responsive TikTok sliders and include interesting videos that help your visitors when buying a product. Every slide contains embedded video along with "View Product" link which greatly increases conversions. All that in just few steps:

  1. Create slider
  2. Add videos
  3. Embed it
  4. Publish it
  5. Done

Open a TikTok video in the browser. On the right, you'll see an Embed button.

Click on the Embed button to bring up the embed code then click Copy code to copy the embed code.

Paste the code in the "Video embed code" field

We are relying solely on TikTok and their way of providing the feature for embedding the videos. Therefore sometimes it can happen that there is a slight delay in showing or playing the video. This should be quite normal as TikTok's logic is responsible for this part and sometimes also, the user connection plays important role, considering that loading of videos needs a lot more bandwidth.

In order to avoid affecting performance of your store, we recommend that you use only up to 10 TikTok videos at once. That way you avoid bad UX for end user while still keeping their attention with interesting content.

Need more help?

We are here for you. You can use our in-app chat (bottom right corner to activate) or send us an email on admin@infiniteapps.net

Need a custom app for your store?

Hit us up and we'll get in touch with you.

Want more turnover for your online business?
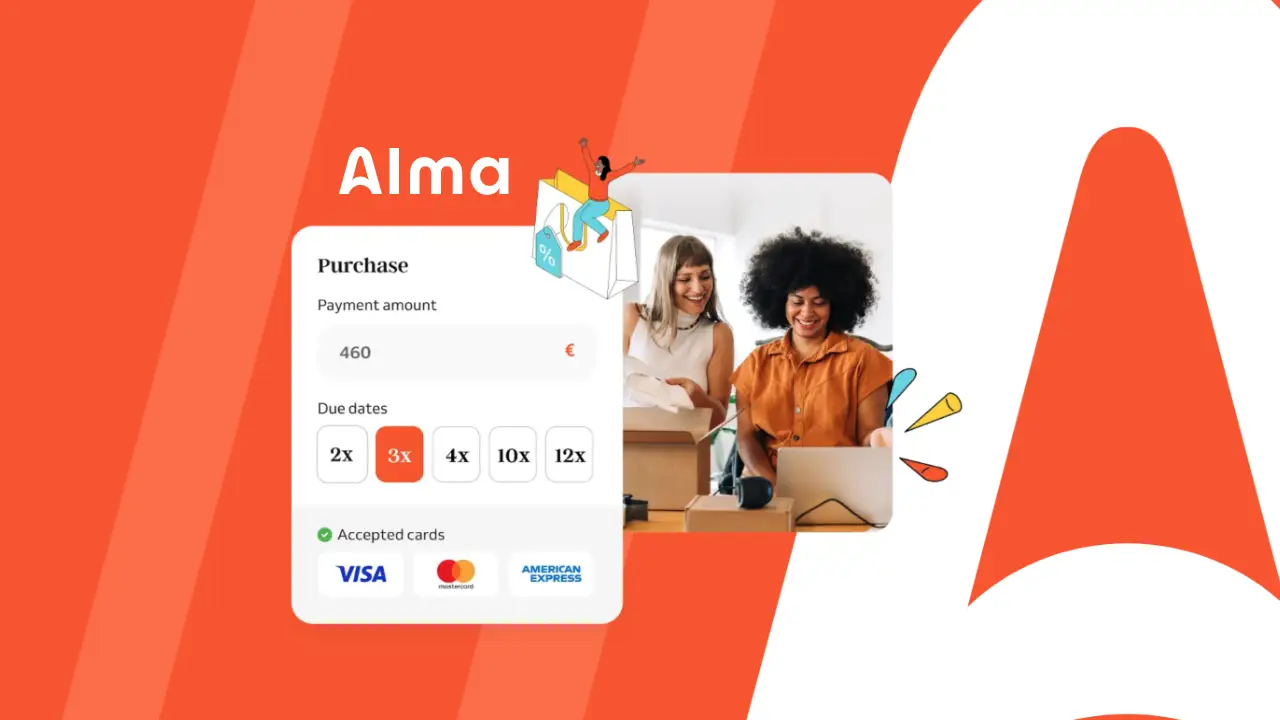
With Alma Payment in installments you get 15% to 20% in turnover on average, thanks to an increase in the average basket, a purchase trigger and customer loyalty who return more easily to the site.

Create Alma account